


Hi Everyone,
It’s the first time that I write a blog post in English to touch a broad community, I hope that our French community will not be disappointed, we’ll stay the first french blog post 😀
Today I would like to talk about how to install the Tanzu environment on our PCC vLAB based on OVH. As you know in the private cloud based on OVH Infrastructure, the VMware Stack is still always in vSphere 6.7 and NSX-V (I hope soon upgrade our lab to vSphere 7 and NSX-T) but anyway. Last week I have a lot of time (Thanks to Holidays) to try to install full lab Tanzu. What do I mean by « Full Lab »? The full lab is for me a platform with the most complete VMware proposition and of course on a Nested environment because it’s not possible to install Tanzu on the physical host (issue around version and permission)
So, How I do it?
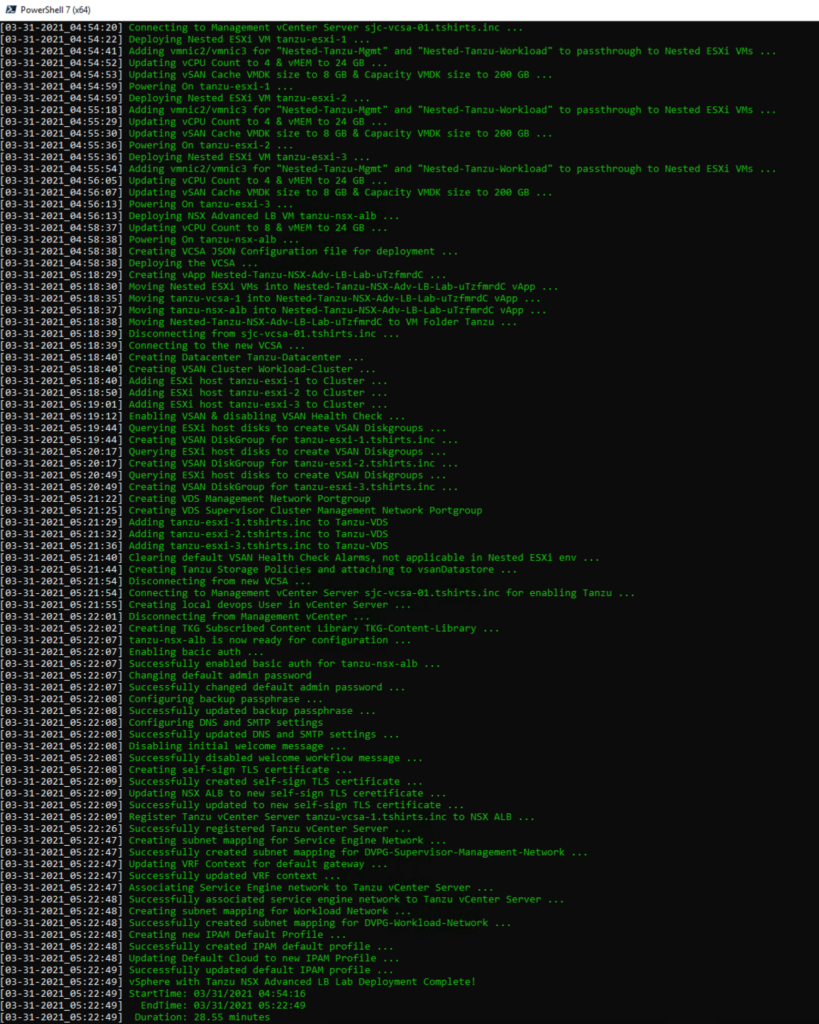
Firstly, we download the automation script here (Thanks to William Lam) to provision an SDDC environment with 3 ESXi Host and 1 vCenter, and 1 NSX Advanced Load Balancer.
I edit this Powershell Script to fill in some pieces of information in our context

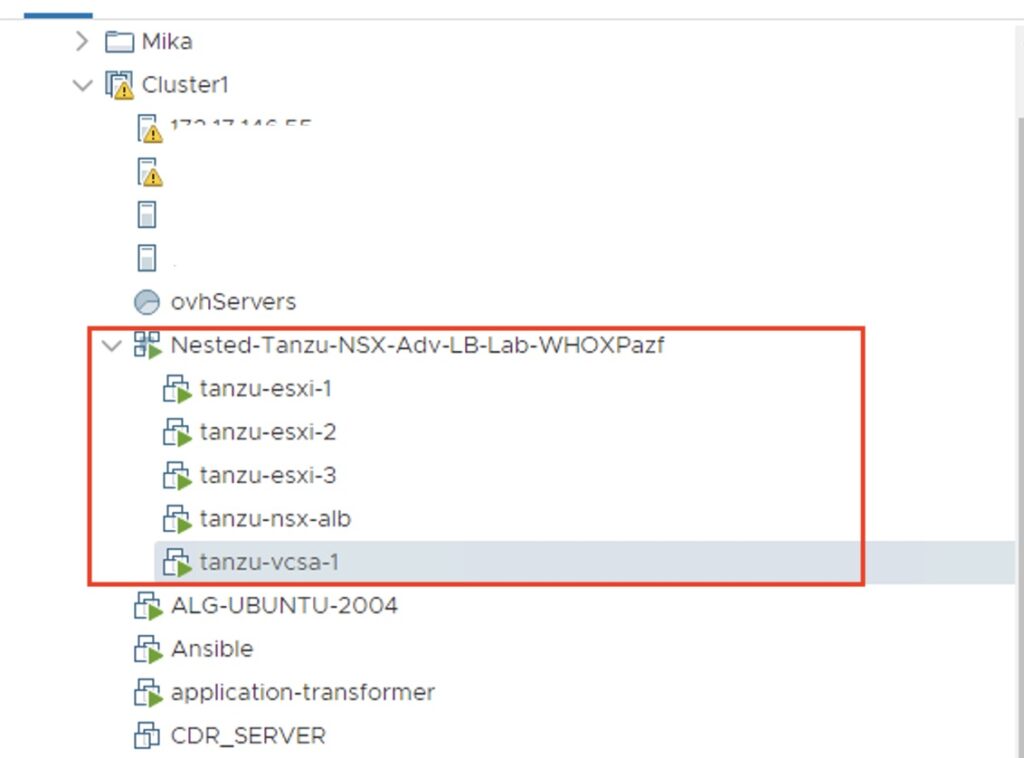
After the script is completed we have a fully vAPP Nested environment up and running in our physical vCenter
Here is my Nested environment on our vLAB.
After the deployment, please login to your Nested vCenter to check or configure vSphere DRS and HA Configuration.
Set up vSphere Network Part
See my network topology before to understand how I was able to route the traffic
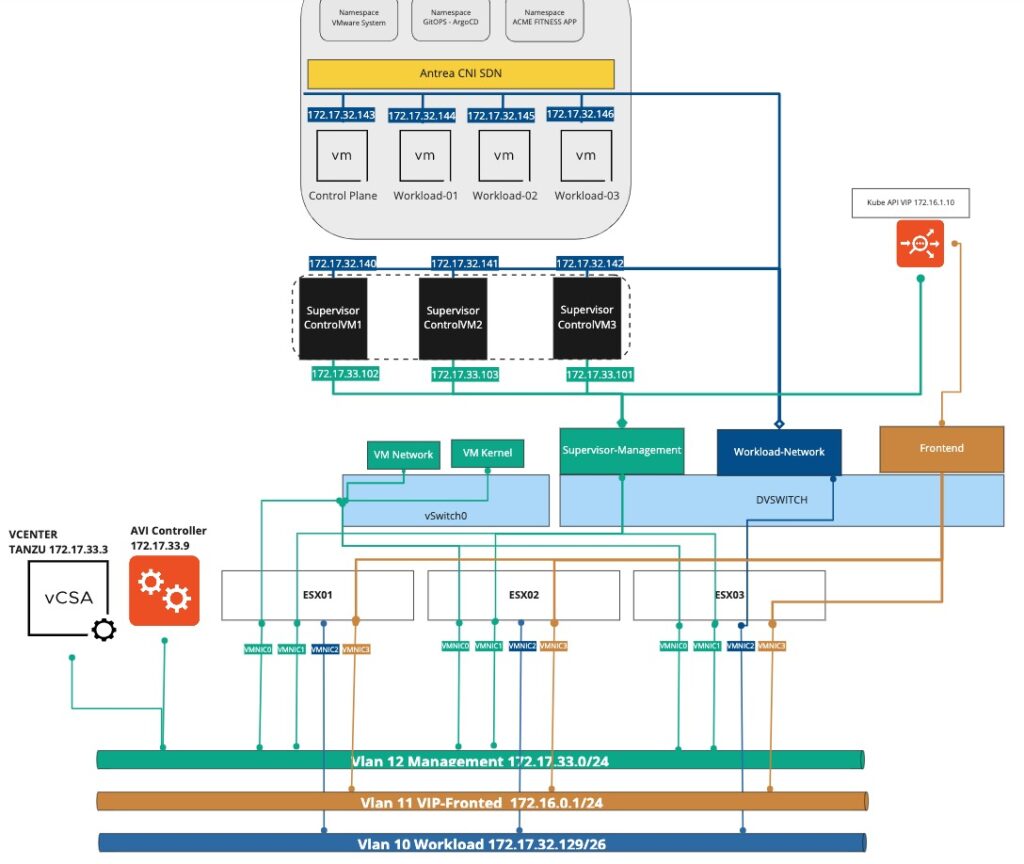
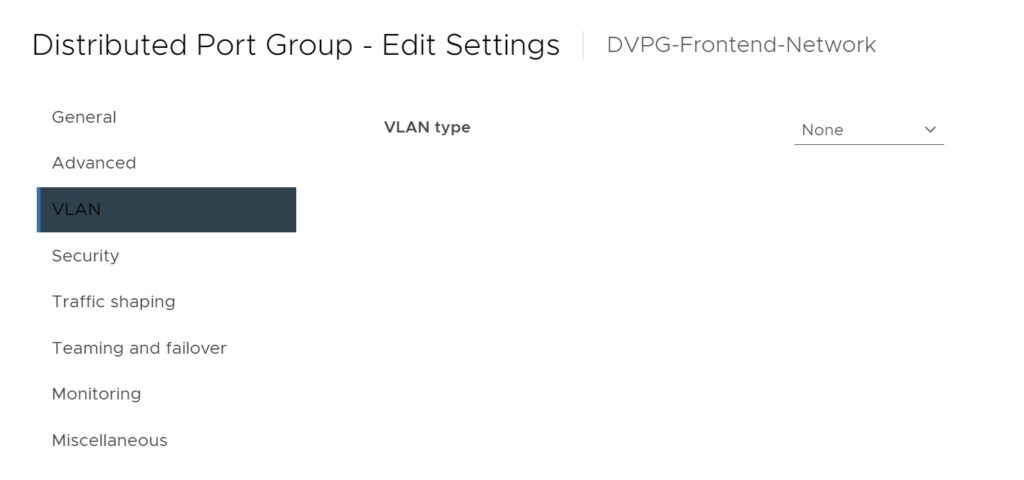
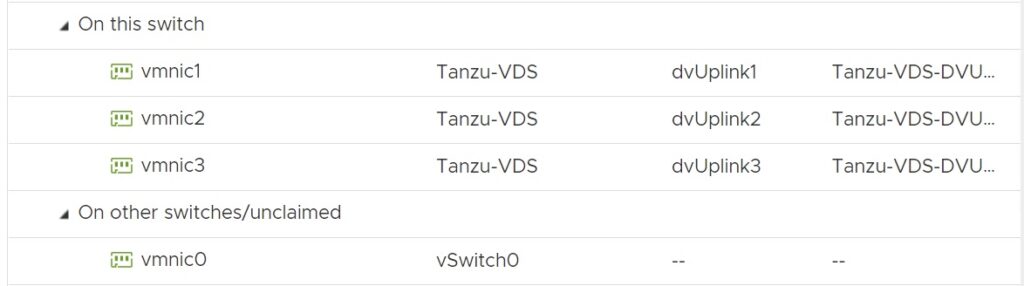
You must create 3 Port-Group for the Tanzu environment and verify on each PG you have VLAN at « None » and all ESXI are connected on the DVS.

In my case, I need to fix the teaming and failover policy per Port-Group to force the traffic on the specific Network card.
Here is my configuration on my DVS
Frontend-Network :
- DVUplink3 – Active
- DVUplink2-1 – Unused
Workload-Network :
- DVUplink2- Active
- DVUplink1-3- Unused
Supervisor-Management-Network :
- DVUplink1 – Active
- DVUplink2-3 – Unused
Set up vSAN Storage Policy
Regarding my storage part, I need to create a new storage policy called « Tanzu-Gold-Storage-Policy »
How to deploy and configure NSX Advanced Load Balancer for Tanzu
The first step is to upload your OVA Avi Controller through the vCenter Console and set some pieces of information
- Static IP Address
- Subnet mask
- Default gateway
- Sysadmin login authentication key
Check the network Topology for NSX Advanced Load Balancer. The AVI Controller has one network card on the Management Port-Group and each service engine have a minimum of two network cards one of them on Frontend-Network (AVI-VIP) and another on Management Port-Group

In the Controller UI, go to Applications > Templates > Profiles > IPAM/DNS Profiles, click Create and select IPAM Profile.


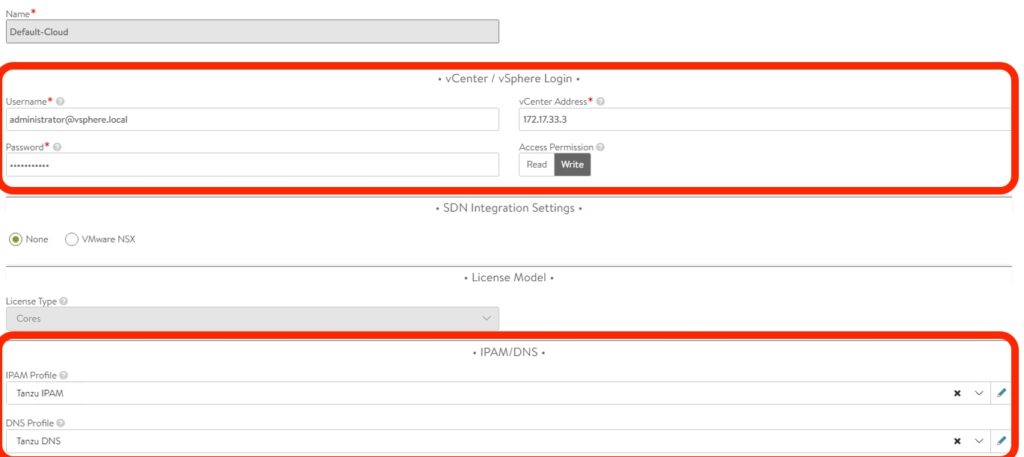
In the second step go to Infrastructure > Clouds and modify the Default Cloud

Add the FQDN of your vCenter and your username and password. Select your IPAM and DNS Profiles at the end of the configuration.
The next step generates a new Self-Sign SSL Certificate.
You must generate your own self-sign certificate and replace the default certificate by your self-sign.
Please go to Security > SSL/TLS Certificate and Click on New

Go to the Administration > Setting and Access Setting to change the default certificate by our self-sign certificate.

Reload the webpage and now you should see the new certificate on your web browser.
Soon to be finished, now we configure a static pool to provide IP addresses for the VIP LB of Pods.
Go to Infrastructure > Cloud Resources > Network and select the Frontend Network Port Group to add Static IP Address Pool

How to deploy VMware vSphere with Tanzu (without NSX)
To deploy Workload Control Plane on VMware vSphere you need vSphere Enterprise Plus and enter a validated license for VMware Tanzu before enabling the WCP feature.
Click on Home and Workload Management


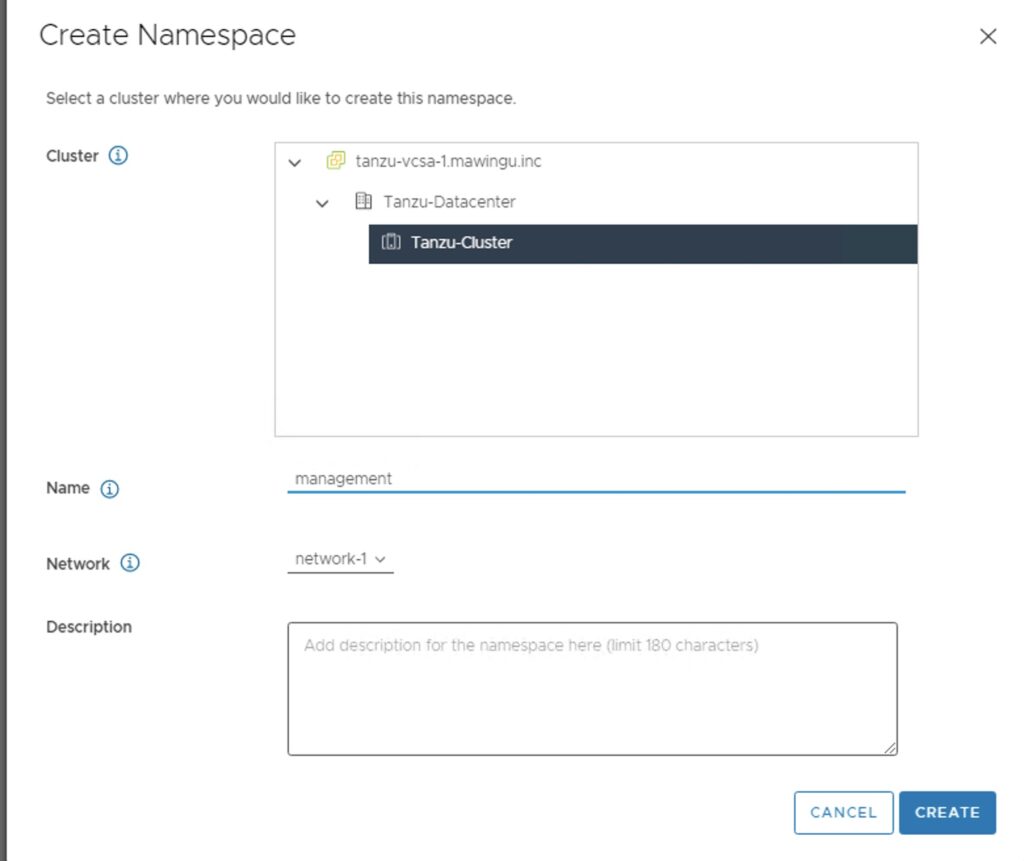
Create our first namespace management
When you have selected your namespace, you must modify the permission and select your storage class. In our Lab I do not modify the capacity and usage to set the limit.
VM Service is a good feature to allow your developer the ability to create a Tanzu Cluster into the Namespace. You can create your own VM Classes or use them by default.

The installation is finished now let’s go to connect to our Supervisor Cluster 🙂
Install Tools on my Jump Linux
In our environment, we have a Windows VM but I find that to administer a K8S cluster a Linux VM is the best way to simplify your life.
I need some tools to administrate my K8S Cluster :
- Kubectx to change the context more easily (download here)
- K9S to manage your K8S Cluster (download here) or you can use Project Octant by VMware
- Kubectl CLI (with vSphere Plugin) (download here) is mandatory to download the tools to manage your K8S Cluster
- docker-desktop
Deploy my first Guest Cluster Tanzu Kubernetes Cluster
- Set your environment with some variables
export TKGIP= Your IP Address of Supervisor Cluster
export USER= [email protected]
export TKC= tkgs-cluster-5
With this command, your can log in directly to your Supervisor’s Cluster
kubectl vsphere login --insecure-skip-tls-verify --server $TKGIP -u $USER --tanzu-kubernetes-cluster-namespace management
Please find here my manifest on my Github to create a news Tanzu Kubernetes Grid Cluster, you can clone my repo directly with this command. Into my repo, you find a file name tkc-cluster.yaml.
git clone https://github.com/Mikael-Lelouch/Kubernetes.git
Execute the manifest with the command
kubectl apply -f tkc-cluster.yamlAnd here we go, we have our first TKC Provisioned on VMware vCenter with a single control plane and three workload nodes. To connect to your TKC Cluster, apply this command on your jump VM.
kubectl vsphere login --insecure-skip-tls-verify --server $TKGIP -u [email protected] --tanzu-kubernetes-cluster-namespace management --tanzu-kubernetes-cluster-name $TKC
Deploy and Configure ArgoCD
ArgoCD is the most popular GitOPS Tool, I love this tool. It can create a « link » between your Git (Source Code) and your Kubernetes Cluster to deploy automatically your application (without kubectl command). The most important is each modification in your source code (Git push) ArgoCD will monitor change in real-time and apply the modification automatically. of course, you have two modes and you can sync your application manually.
#Create a new namespace
kubectl create namespace argocd

#Deploy ArgoCD
kubectl apply -f https://raw.githubusercontent.com/argoproj/argo-cd/stable/manifests/install.yaml -n argocd

# potentially have to change the registry for the redis image in deployement.apps/argocd-server

#Set the service as type LoadBalancer
kubectl patch service/argocd-server --namespace argocd --type merge --patch '{"spec":{"type":"LoadBalancer"}}'

#Retrieve your password

echo '\t Be sure to save this pwd - it will be used to access the ArgoCD Server GUI' -- $(kubectl -n argocd get secret argocd-initial-admin-secret -o jsonpath="{.data.password}" | base64 -d)
Enter the URL and log in with « admin » and your password that you could retrieve in the above command

In my example, I sync some APP examples from this ArgoCD Github
Deploy VMware Tanzu Mission Control
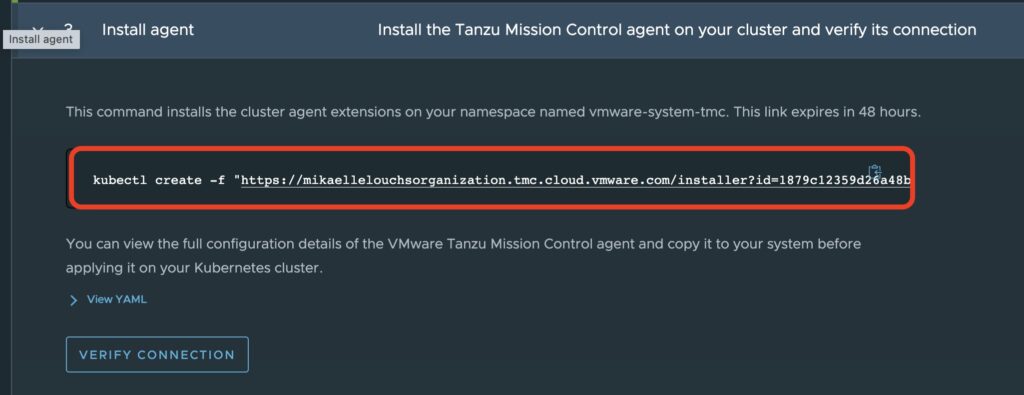
Pretty easy to connect your TKC (Tanzu Kubernetes Cluster) to Tanzu Mission Control, you need an Organisation from Tanzu Mission Control
- Click on Clusters
- Attach Cluster
- Specify Cluster name and Cluster Group


Deploy VMware Tanzu Observability
VMware Tanzu Observability is a SaaS component to aggregate all app metrics and trace them to a single SaaS console. Tanzu Observability is integrated from Tanzu Mission Control
Let’s go to Tanzu Observability to create an API Token
Select Generate button to generate a new API Key and copy and past in Tanzu Mission Control


Move to Tanzu Mission Control on your cluster > Overview > Add Integration > Tanzu Observability

Enter your own URL (not vmware.wavefront.com) and paste your API Key

After a few seconds, my Tanzu Cluster is connected to Tanzu Observability

Now I’ve, Tanzu Kubernetes Grid with TMC and TO lab and of course NSX Advanced Load Balancer UP AND RUNNING
I hope you will enjoy this first blog in English which is a first for me and last but not least I would like to say thanks to my crew team for the proofreading.
See you soon and Enjoy with Tanzu !